

Blinds on metal doors are a popular addition in many homes and offices due to their ability to provide privacy and control the amount of light entering a space. These blinds not only enhance the door’s functionality but also contribute to the room’s overall aesthetic.

However, there are various reasons why you may need to remove these blinds. Common reasons include replacing old or damaged blinds, cleaning hard-to-reach areas, or conducting repairs on the door or the blinds themselves.
This article provides a step-by-step guide on how to remove blinds to metal door safely and efficiently. Following these instructions ensures that the process is smooth and that neither the blinds nor the metal door is damaged during removal. Whether you’re a homeowner or a tenant, this guide will take you through the necessary tools, techniques, and tips for a successful outcome.
Understanding the Blinds Installation on Metal Doors
Types of Blinds on Metal Doors
Blinds installed on metal doors come in various types, each designed to cater to specific needs and preferences. The most common types include mini, roller, and magnetic blinds. Mini blinds are lightweight and versatile, perfect for controlling light and ensuring privacy.
Roller blinds are sleek and easy to operate by rolling up or down. Magnetic blinds, on the other hand, are ideal for those who prefer a non-invasive and easily adjustable solution since they attach directly to the metal surface without requiring screws or adhesives.
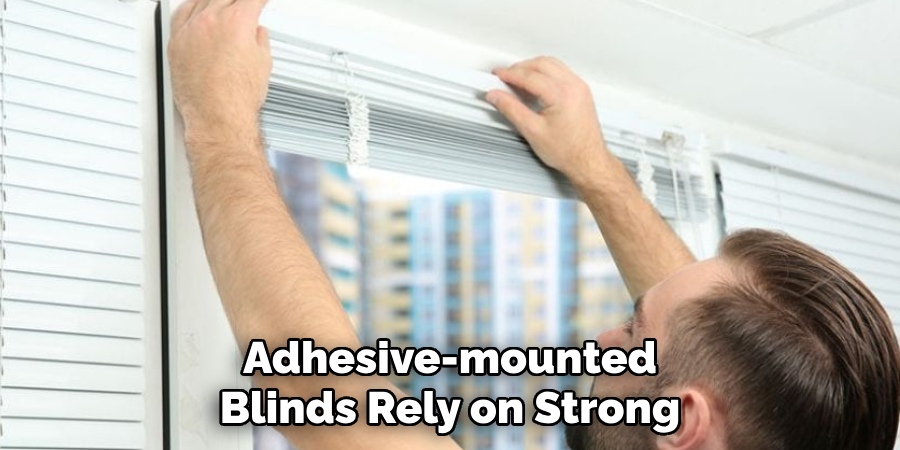
The method of mounting these blinds can vary significantly and directly affects how they should be removed. Screw-mounted blinds are fixed with brackets secured to the door using screws, ensuring robust installation.
Adhesive-mounted blinds rely on strong adhesive strips to remain in place, offering a simple but less sturdy option. Magnetic blinds, as the name suggests, adhere to the door using magnetic force, making them the easiest to attach and remove.
Identifying the Mounting Mechanism
Before starting the removal process, inspecting and identifying how the blinds are attached to the door is crucial. Begin by closely examining the edges or brackets to determine whether screws, adhesives, or magnets are being used.
For screw-mounted blinds, look for metallic brackets and tiny screw heads around the top or side edges. Adhesive-mounted blinds often show visible adhesive strips along the mounting edges, while magnetic blinds can usually be gently tugged to test their magnetic hold.
Understanding the mounting mechanism is essential to prevent unnecessary damage to both the blinds and the metal door. Using the wrong technique during removal may lead to scratches, dents, or other issues that could compromise the door’s appearance or functionality. Taking a moment to identify the mechanism will save time and ensure a smooth, damage-free removal process.
Tools and Materials Required for the Job
Essential Tools
To successfully remove blinds from a metal door, you will need a few essential tools to make the process easier and more efficient. A screwdriver, whether flathead or Phillips, is vital for handling screw-mounted blinds, while a drill can be used for removing screws that are stripped or stuck.
If your blinds are adhesive-mounted, a putty knife or pry tool will help gently remove the adhesive without damaging the metal surface. For particularly stubborn adhesive mounts, an adhesive remover can be invaluable for cleaning up residue effectively. Preparing these tools ahead of time will ensure a smooth removal process.
Safety Equipment
Safety should always be a priority when removing blinds from a metal door. Wearing gloves will protect your hands from potential cuts or injuries caused by sharp edges, screws, or debris during the process. Additionally, having a ladder or step stool on hand is a good idea if you need to install access blinds at higher positions on the door.

Ensuring stability while working at an elevated height is critical to prevent accidents. Equipping yourself with the proper safety gear allows you to conduct the removal process confidently and without unnecessary risk to your well-being.
How to Remove Blinds to Metal Door: Step-by-Step Guide
Removing Screw-Mounted Blinds
- Begin by locating the screws on the brackets that secure the blinds to the metal door. Use a screwdriver, either flathead or Phillips, depending on the type of screws used.
- Carefully unscrew each screw, starting with the ones on the outer edges for better stability. Hold the brackets or the blinds with your free hand to prevent them from falling during the process.
- Once all screws are removed, gently pull the blinds away from the door, ensuring no brackets or hardware are left attached.
- Place the screws and brackets in a small container or zippered bag to keep them organized. Labeling them if you plan to reinstall the blinds is recommended. If disposal is required, ensure all components are secure to prevent injuries.
- Inspect the door surface for any debris or scratches, and clean it with a soft cloth.
Detaching Adhesive-Mounted Blinds
- Examine the mounting area to identify the adhesive strips or pads securing the blinds to the metal door.
- Insert a putty knife or pry tool under one edge of the bracket or blind and gently apply pressure to loosen the adhesive. Work slowly to avoid damaging the door’s surface.
- Once the bond begins to weaken, gradually peel or lift the blinds from the metal door, applying steady pressure to avoid tearing the adhesive.
- If residue remains, use an adhesive remover for safe use on metal surfaces. Apply a small amount to a cloth or sponge and gently rub the affected area in a circular motion until cleaned.
- Wipe down the area with a damp cloth to remove any leftover adhesive remover, ensuring the door’s surface is clean and smooth.

Removing Magnetic Blinds
- Start by gripping the magnetic blinds firmly at their edges or base. Carefully lift one corner to test the magnetic hold.
- Gradually pull the blinds away from the door, working in small sections. Avoid using excessive force to prevent the magnet from scratching or damaging the paint.
- For taller blinds, consider removing the sections from top to bottom to maintain control and avoid dropping the blinds.
- Once detached, inspect the magnetic surface of both the blinds and the door. If there are smudges or marks, clean the area with a soft and slightly damp cloth.
- Store the magnetic blinds flat or in their original shape to maintain their functionality. If you don’t plan to reuse them, consider recycling or donating the blinds to keep them out of landfills.
Cleaning and Inspecting the Door After Removal
Cleaning Residue and Marks
After removing the blinds, cleaning the door is important to ensure it is free of any residue or marks left by adhesives, brackets, or magnets. For adhesive residue, start by applying an adhesive remover or a small amount of rubbing alcohol to a soft cloth and gently rubbing the affected area in circular motions. Avoid using abrasive tools or harsh chemicals that could damage the door’s finish.
Use a mild soap mixed with warm water and a non-scratch sponge for cleaning marks left by brackets or magnets. Wipe the area thoroughly and dry the surface with a clean cloth. Always test cleaning solutions on a small, inconspicuous area of the door first to ensure compatibility with the metal surface.
Inspecting the Door for Damage
Once the door is clean, carefully inspect it for any signs of damage, including scratches, dents, or chipped paint, that might have occurred during the blind installation or removal process.
Minor scratches or chipped paint can often be addressed using touch-up paint matched to the door’s color. For dents, consider using a metal repair kit to restore the door’s surface. Addressing any issues promptly will help maintain your metal door’s aesthetic appeal and functionality.
Tips for Reinstalling or Replacing Blinds
Choosing Replacement Blinds
When selecting replacement blinds for a metal door, choosing options that are both functional and compatible with the surface is essential. Look for blinds specifically designed for metal doors, such as magnetic blinds or clip-on models, which offer easy installation without the need for screws or adhesives.

These types of blinds minimize the risk of damaging your door while providing a secure and stable fit. Additionally, consider the style and size of the blinds to ensure they meet your aesthetic preferences and fit properly within the door’s dimensions. Lightweight materials, like aluminum or fabric, are excellent choices for durability and ease of use.
Reinstalling Blinds
To reinstall the same blinds or new ones securely, begin by carefully aligning the brackets, adhesive pads, or magnetic mounts with the designated area on the door. Use a level to ensure the blinds are straight before securing them in place.
For screw-mounted blinds, tightly fasten the screws but avoid overtightening, which can damage the door. Adhesive-mounted blinds should be pressed firmly for optimal adhesion, and magnetic blinds should be adjusted for even placement. Testing the blinds by opening and closing them ensures stability and a proper fit, creating a polished and functional finish.
Troubleshooting Common Issues
Dealing with Stripped Screws
Stripped screws can be a frustrating obstacle during the removal of blinds. First, try using a rubber band to create an additional grip to address this. Place the rubber band over the screw head, then carefully turn it with a screwdriver. If this doesn’t work, consider using a screw extractor, which is designed to grip and remove screws with damaged heads.
For extreme cases, a drill can be used to carefully bore into the screw and extract it. Be cautious when using power tools to avoid damage to the door surface. Always work slowly and methodically to ensure safety and efficiency.
Removing Stubborn Adhesives
Strong adhesives can leave challenging residue on your metal door, requiring specific techniques for removal. Start by using heat to soften the adhesive; a hair dryer or heat gun on a low setting can help loosen it. Once softened, gently peel it away with a plastic scraper or putty knife.
For sticky residue, apply natural alternatives like vinegar or baking soda mixed with water. These methods are safe for most metal surfaces and are environmentally friendly. Avoid abrasive tools or harsh chemicals, as they might damage the door’s finish, ensuring a clean and smooth result after removal.

Conclusion
Removing blinds from a metal door requires a methodical approach for the best results. By following the outlined steps on how to remove blinds to metal door, including using the proper tools, cleaning residue, and carefully inspecting for damage, you can ensure the process is smooth and hassle-free.
Addressing issues like adhesive residue or stripped screws promptly maintains the door’s condition. Reusing or recycling the removed materials promotes sustainability while exploring compatible replacement options keeps the door functional and stylish. You’ll achieve a successful and efficient outcome with attention to detail and preparation.
Edmund Sumlin is a skilled author for Metal Fixes, bringing 6 years of expertise in crafting a wide range of metal fixtures. With a strong background in metalwork, Edmund’s knowledge spans various types of fixtures, from decorative pieces to functional hardware, blending precision with creativity. His passion for metalworking and design has made him a trusted resource in the industry.
Professional Focus:
- Expert in Metal Fixtures : Edmund aesthetic specializes in creating durable and innovative metal fixtures, offering both appeal and functionality. His work reflects a deep understanding of metalworking techniques and materials.
- Sustainability Advocate : He is dedicated to using sustainable practices, ensuring that every fixture is crafted with eco-friendly methods while maintaining high-quality standards.
In his writing for Metal Fixes, Edmund provides valuable insights into the latest trends, techniques, and practical advice for those passionate about metal fixtures, whether they are professionals or DIY enthusiasts. His focus on combining artistry with engineering helps others discover the true potential of metal in design.