

Are you tired of looking at dirty, grimy aluminum heads on your engine? Not only can buildup impact the performance and longevity of your engine, but it can also be an eyesore.
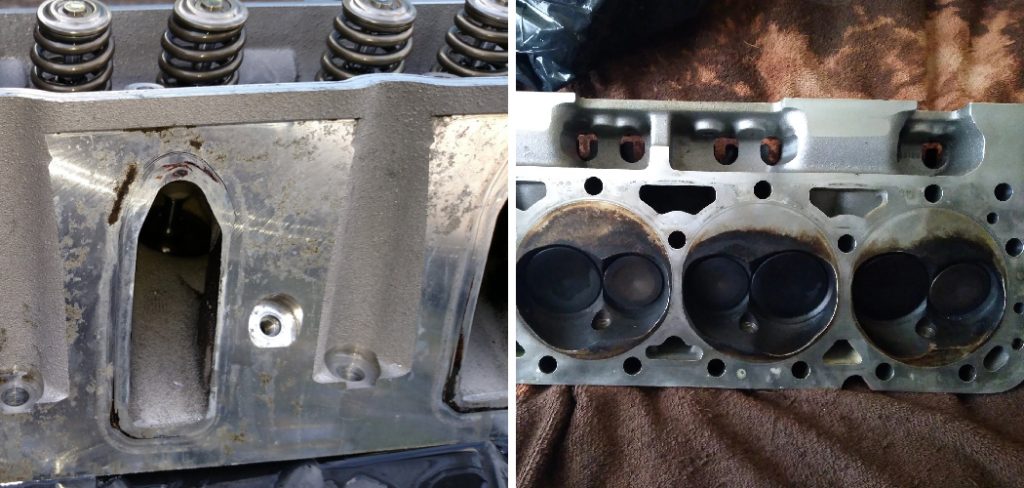
How to clean aluminum heads is a critical maintenance task that can significantly enhance the performance and longevity of your engine. Aluminum heads are a key component in many modern engines, and they are known for their lightweight and efficient heat dissipation properties.
However, over time, they can accumulate dirt, oil, carbon deposits, and other residues that impede their functionality. Proper cleaning ensures optimal engine performance and prevents potential damage and wear.
In this guide, we will explain the essential steps and considerations for effectively cleaning aluminum heads, ensuring your engine remains in peak condition.
What Will You Need?
Before we dive into the cleaning process, let’s gather the necessary materials and tools. Here’s a list of items you will need to clean your aluminum heads properly:
- Degreaser or engine cleaner
- Soft-bristled brush
- Scraper tool (optional)
- Clean rags or towels
- Water hose with a spray nozzle attachment
- Rubber gloves (recommended)
Using a degreaser or engine cleaner specifically designed for aluminum surfaces is essential. Using harsh chemicals or abrasive cleaners can damage the surface of your aluminum heads, causing them to corrode or discolor.
8 Easy Steps on How to Clean Aluminum Heads
Step 1. Prepare Your Workspace:
Ensuring a clean and organized workspace is crucial before starting the cleaning process. Begin by choosing a well-ventilated area, such as a garage with open doors or an outdoor space. This will help disperse any fumes from the degreaser and other cleaning agents.
Lay down a tarp or some old newspapers to protect your floor from spills and stains. It’s also a good idea to have a waste bin or designated area nearby to dispose of used rags, towels, and any removed debris.
Next, gather all your cleaning materials and tools to be within reach. Wearing rubber gloves is highly recommended to protect your hands from any chemical exposure. If you’re working on the engine while it’s still in the vehicle, consider disconnecting the battery to prevent any accidental electric shocks or short circuits.
For engines that have been running recently, ensure they have cooled down before you start cleaning to avoid burns or injuries. Taking these preparatory steps will help create a safe and efficient cleaning process for your aluminum heads.
Step 2. Apply the Degreaser:
Once your workspace is prepared, the next step is to apply the degreaser or engine cleaner to the aluminum heads. Spray the cleaner generously over the surfaces, covering all areas with accumulated grime and deposits.
Allow the degreaser to sit for a few minutes, as the product’s guidelines instruct. This will help break down the dirt and oil, making it easier to remove during cleaning. Be cautious not to let the cleaner dry on the surface, as this may make it harder to rinse off later.
Step 3. Scrub the Surface:
After allowing the degreaser to penetrate the grime, use a soft-bristled brush to scrub the aluminum heads. Focus on areas with heavy buildup, applying gentle but firm pressure to lift off the dirt and deposits.
For more stubborn grime, a scraper tool can be used carefully to avoid scratching or damaging the aluminum surface. Work methodically to ensure all surfaces are cleaned, paying particular attention to the crevices and hard-to-reach areas.
Step 4. Rinse Thoroughly:
With the grime loosened, it’s time to rinse off the degreaser and dislodged dirt. Using a water hose with a spray nozzle attachment, thoroughly rinse the aluminum heads, ensuring all cleaning residue is washed away.
Direct the spray to reach into any nooks and crannies where debris might be hiding. Removing all traces of the cleaner is important to prevent any potential harm to the aluminum.
Step 5. Dry the Aluminum Heads:
Once rinsed, use clean rags or towels to dry the aluminum heads completely. Ensure that no moisture is left on the surface, as residual water can lead to oxidation or corrosion over time. Pat the surfaces dry gently, paying extra attention to any grooves or recessed areas where water might linger.
Step 6. Inspect for Remaining Buildup:
After drying, inspect the aluminum heads to ensure all grime and residues have been removed. If any spots of dirt or oil remain, you may need to repeat the cleaning process in those specific areas. A clean surface is crucial for the aluminum heads to perform optimally and maintain their longevity.
Step 7. Reassemble Any Removed Parts:
If you had to disassemble any engine parts to access the aluminum heads, carefully reassemble them once the cleaning is complete.
Ensure all components are securely fastened and properly aligned to avoid operational issues. Double-check connections and fittings for a smooth reassembly.
Step 8. Restore Power and Test the Engine:
If you disconnected the battery, reconnect it now. Start the engine and let it run for a few minutes to ensure everything functions correctly.

Listen for any unusual noises and look for any abnormal vibrations or leaks. This final check helps verify that the cleaning process did not disrupt any components.
Following these steps will effectively clean your aluminum heads, ensuring your engine remains in excellent condition and performs optimally.
5 Additional Tips and Tricks
- Use a Soft-Bristled Brush: Opt for a soft-bristled brush to gently scrub the surfaces without scratching the aluminum. This helps in removing stubborn grime without causing damage.
- Apply Citrus-Based Cleaners: Citrus-based cleaners effectively break down grease and grime. They are gentle on aluminum heads and also environmentally friendly.
- Rinse with Warm Water: After scrubbing, rinse the aluminum heads thoroughly with warm water. Warm water helps remove any remaining cleaning agents, ensuring a residue-free surface.
- Dry Using Compressed Air: To prevent corrosion, ensure you dry the aluminum heads completely. Using compressed air is a quick and effective way to eliminate water from crevices and hard-to-reach areas.
- Polish for a Finishing Touch: Once clean and dry, apply a metal polish specifically designed for aluminum. This brings out a brilliant shine and adds a protective layer against future dirt and oxidation.
With these additional tips and tricks, you can ensure that your aluminum heads remain in top condition for a long time.
5 Things You Should Avoid
- Using Abrasive Cleaning Tools: Avoid using steel wool, wire brushes, or any abrasive scrubbers, as they can scratch and damage the aluminum surface, leading to potential long-term deterioration.
- Applying Harsh Chemicals: Strong acids or alkaline cleaners can etch or discolor the aluminum. Stick to gentle, aluminum-safe cleaners to protect the integrity of the material.
- Skipping the Rinse Step: Failing to thoroughly rinse off cleaning agents can leave residues that may lead to corrosion or leave unsightly streaks. Always ensure a thorough rinse with clean water.
- Ignoring Proper Drying: Allowing aluminum heads to air-dry can cause water spots and encourage corrosion. Always use a dry cloth or compressed air to completely dry the heads.
- Neglecting Regular Maintenance: Overlooking routine cleaning can result in the buildup of grime and deposits, making it more difficult to clean over time. Consistent maintenance ensures that your aluminum heads stay in optimal condition.
By avoiding these common mistakes, you can keep your aluminum heads looking and performing their best for years.
Does Toothpaste Clean Aluminium?
Yes, toothpaste can be used to clean aluminum surfaces. The mild abrasives in toothpaste help remove dirt and grime without damaging the aluminum.
However, it is important to note that not all toothpastes are created equal, and some may contain harsh chemicals or additives that could potentially harm the aluminum surface.
It is best to use plain white toothpaste without any added whitening agents or gels to clean aluminum.
Additionally, using a soft-bristled brush and toothpaste can provide even better results. Remember to rinse thoroughly and dry the surface afterward.
When Should You Seek Professional Help?
If you notice extensive corrosion or damage to your aluminum heads, it may be best to seek professional help. A skilled mechanic or auto body specialist will have the proper tools and knowledge to repair any severe damage.
Additionally, suppose you are unsure about how to properly clean your aluminum heads without causing damage. In that case, consulting with a professional for advice and guidance is always a good idea.
However, by following the tips and tricks mentioned in this guide, you can maintain your aluminum heads yourself and prevent any major issues from arising.
Conclusion
How to clean aluminum heads doesn’t have to be a daunting task. By using the right tools and techniques, you can keep your aluminum heads in pristine condition.
Always opt for soft-bristled brushes and gentle, citrus-based cleaners to effectively remove grime without causing damage. Thorough rinsing with warm water helps eliminate residues while drying with compressed air prevents corrosion. Polishing the heads adds a finishing touch and offers additional protection.
Avoiding abrasive tools and harsh chemicals, ensuring proper drying, and maintaining a consistent cleaning routine will help preserve the quality and longevity of your aluminum heads.
By following these guidelines, you can ensure that your aluminum heads perform at their best and maintain their appearance for years to come.
Edmund Sumlin is a skilled author for Metal Fixes, bringing 6 years of expertise in crafting a wide range of metal fixtures. With a strong background in metalwork, Edmund’s knowledge spans various types of fixtures, from decorative pieces to functional hardware, blending precision with creativity. His passion for metalworking and design has made him a trusted resource in the industry.
Professional Focus:
- Expert in Metal Fixtures : Edmund aesthetic specializes in creating durable and innovative metal fixtures, offering both appeal and functionality. His work reflects a deep understanding of metalworking techniques and materials.
- Sustainability Advocate : He is dedicated to using sustainable practices, ensuring that every fixture is crafted with eco-friendly methods while maintaining high-quality standards.
In his writing for Metal Fixes, Edmund provides valuable insights into the latest trends, techniques, and practical advice for those passionate about metal fixtures, whether they are professionals or DIY enthusiasts. His focus on combining artistry with engineering helps others discover the true potential of metal in design.