

Proper ventilation is a crucial aspect of maintaining a healthy and energy-efficient home. Continuous steel vents are an excellent choice for ensuring adequate airflow in areas like attics or crawl spaces, reducing moisture build-up and preventing potential structural damage. These vents offer durability and long-lasting performance and are capable of withstanding harsh environmental conditions.

In this guide on how to install continuous steel vents , we will walk you through the step-by-step process of installing continuous steel vents, providing you with practical tips to ensure their effective installation and optimal performance.
Why Choose Continuous Steel Vents?
Continuous steel vents are a popular choice among homeowners due to their numerous advantages over other ventilation options. These include:
Durability and Strength:
Continuous steel vents are made of galvanized or stainless steel, making them strong enough to withstand extreme weather conditions and resist corrosion. This ensures their longevity and minimizes the need for frequent replacements.
Superior Airflow:
Continuous steel vents are designed to allow consistent airflow in attics or crawl spaces, preventing moisture build-up and reducing the risk of mold growth. This helps maintain a healthy indoor living environment and prevents potential structural damage caused by excess moisture.
Easy Maintenance:
Continuous steel vents require minimal maintenance, making them a convenient option for homeowners. They can be easily cleaned with a hose or pressure washer, removing any dirt or debris that may have accumulated on the surface over time.
Materials Needed
Before starting the installation process, make sure you have all the necessary materials, including:
- Continuous Steel Vents
- Metal Screws or Nails
- Roofing Cement
- Measuring Tape
- Pencil
- Drill
- Safety Gear (Gloves, Goggles, and Mask)

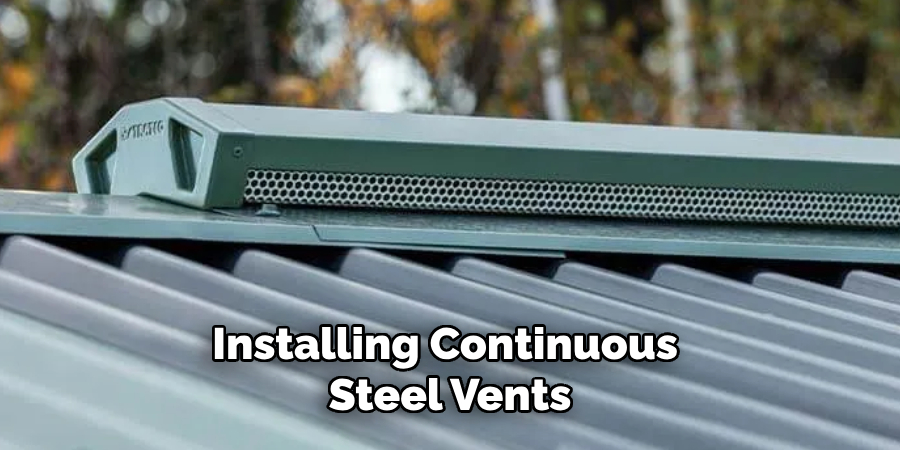
8 Step-by-step Installation Process on How to Install Continuous Steel Vents
Step 1: Measure and Mark
Begin the installation process by accurately measuring the area where the continuous steel vents will be installed. Use a measuring tape to determine the dimensions of the designated location. Once measured, use a pencil to mark the outline on the surface, ensuring the vent fits correctly and that the marks are aligned properly with any existing vents or structural elements.
Precise measuring and marking are critical, as they will guide the cutting and fitting process, ensuring a seamless installation. Always double-check your measurements to avoid errors that could lead to misalignment or improper sizing.
Step 2: Cut the Hole
Once the measurements have been confirmed and marked, the next step involves cutting a hole to accommodate the continuous steel vent. Use a saw appropriate for cutting through the surface material, such as a reciprocating saw or a circular saw. Carefully cut along the marked outline, ensuring clean edges and minimizing jaggedness or uneven sections.
It’s crucial to follow safety precautions by wearing safety gear, including gloves, goggles, and a mask, to protect against dust and debris. Ensure the cutout is the correct size to provide a snug fit for the vent, which will aid in secure installation and effective ventilation.
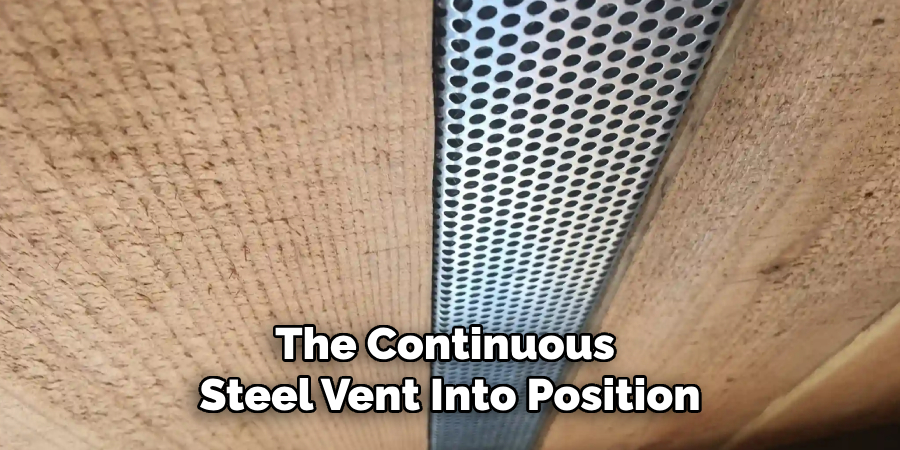
Step 3: Install the Vent
After cutting the hole, place the continuous steel vent into position. Ensure it fits snugly and flush against the surface, with no gaps or spaces between the vent and surface material. Use metal screws or nails to fasten the vent securely in place, ensuring it does not move or shift.
The number of screws or nails needed will depend on the size and weight of the vent. For larger vents, it’s recommended to use more fasteners to ensure proper support and stability.
Step 4: Seal Around the Edges
Once the vent is securely installed, use roofing cement around the edges of the vent to create a watertight seal. This will prevent any water from seeping into the structure through gaps or cracks between the vent and surface material. Apply a generous amount of roofing cement, ensuring all edges are adequately covered for maximum protection against water intrusion.
Butyl tape can also be used in place of roofing cement for a more straightforward and mess-free option.
Step 5: Secure any Loose Edges
In some cases, the edges of the cutout may become loose or uneven after cutting, making it challenging to achieve a secure fit for the vent. In such instances, use additional screws or nails to secure any loose edges, ensuring they are flush against the surface material. This will provide added stability and prevent potential damage caused by movement or shifting over time.
It’s also essential to check and secure any existing vents or structural elements in the area, ensuring they are not obstructed or affected by the installation of the continuous steel vent.
Step 6: Paint (Optional)
If desired, painting the continuous steel vent can enhance its appearance and help it blend seamlessly with the surrounding surface. When opting to paint, choose a high-quality, exterior-grade paint that is specifically formulated to adhere to metal surfaces, ensuring durability and protection against the elements. Before painting, thoroughly clean the vent to remove any dust, oil, or debris that could interfere with paint adhesion.
Priming the surface with a metal primer is also recommended, as it ensures a smooth finish and increases the longevity of the paint. Apply the paint evenly using a brush or spray technique, and allow adequate drying time according to the paint manufacturer’s instructions. Although optional, painting can add a personalized touch to your installation and provide an additional layer of protection to the steel vent.
Step 7: Test the Ventilation
With the installation complete, it’s essential to test the ventilation system to ensure proper functioning. Use a smoke pencil or incense stick and hold it near the vent, observing its movement to determine if there is consistent airflow. If the smoke or scent moves away from the vent, this indicates that the air is being properly ventilated. Repeat this process for all installed vents to confirm adequate ventilation in your attic or crawl space.
If there is no noticeable airflow, troubleshoot by checking for any potential obstructions such as debris or loose edges blocking the vent’s opening.
Step 8: Regular Maintenance
To ensure optimal performance and longevity of your continuous steel vents, it’s crucial to regularly maintain and inspect them. This includes cleaning any accumulated debris or dust from the surface of the vent, checking for any damage or loose screws/nails, and ensuring proper ventilation is still being achieved.
Regular maintenance will not only prolong the lifespan of your vents but also help improve overall air quality and prevent potential issues caused by poor ventilation.
Following these steps on how to install continuous steel vents will ensure a successful and efficient installation of continuous steel vents. Remember to always prioritize safety, accuracy in measurement and marking, proper sealing, and regular maintenance to enjoy the benefits of effective ventilation in your space. Happy installing!
How Much Could It Cost?
The cost of installing continuous steel vents varies depending on several factors, including the size of the vents, the type of surface material they are being installed into, and whether the installation is a DIY project or requires professional services. On average, the cost for the vents themselves ranges from $2 to $4 per linear foot. Additional costs may include tools, safety equipment, and sealing materials such as roofing cement or butyl tape.
If hiring a professional, labor expenses could add anywhere from $350 to $600 to the total cost, depending on the complexity and size of the installation. Painting the vents adds a minor cost, with exterior-grade paint averaging between $15 to $30 per gallon. Overall, budgeting for both materials and potential professional help is crucial to avoid any unexpected expenses during the installation process.
Frequently Asked Questions
Q: Can Continuous Steel Vents Be Installed on Any Surface Material?
A: Yes, continuous steel vents can be installed on various surfaces such as wood, metal, and concrete. Make sure to use appropriate tools and techniques for cutting through the specific surface material.
Q: Can I Paint My Continuous Steel Vents Any Color?
A: Yes, continuous steel vents can be painted any desired color. Use a high-quality exterior-grade paint specifically formulated for metal surfaces and follow proper preparation and application techniques for the best results.
Q: What Is the Recommended Maintenance Schedule for Continuous Steel Vents?
A: It’s recommended to inspect and clean your continuous steel vents at least twice a year, preferably in spring and fall, to ensure proper ventilation and prevent potential damage or issues. However, if you live in an area with harsh weather conditions or experience noticeable airflow issues, it’s advisable to inspect them more frequently.
Q: Can I Install Continuous Steel Vents Myself, or Should I Hire a Professional?
A: Installing continuous steel vents can be done as a DIY project. However, it’s essential to have basic knowledge of the necessary tools and techniques, take proper safety precautions, and ensure accurate measurements for a successful installation. If you are unsure or uncomfortable with the process, it’s best to hire a professional for the installation.
Conclusion
Installing continuous steel vents is a vital process that contributes significantly to the quality and efficiency of ventilation within your space. By following the detailed steps on how to install continuous steel vents outlined, from accurate measurement and precise cutting to secure installation and effective sealing, you ensure that your vents function optimally. Regular maintenance and thorough testing safeguard these installations against wear or unexpected issues, enhancing their longevity and performance.
Through careful planning and execution, your investment in continuous steel vents will yield improved air quality and comfort in your environment for years to come. Remember, attention to detail in every stage—from preparation to maintenance—is key to a successful installation.
Edmund Sumlin is a skilled author for Metal Fixes, bringing 6 years of expertise in crafting a wide range of metal fixtures. With a strong background in metalwork, Edmund’s knowledge spans various types of fixtures, from decorative pieces to functional hardware, blending precision with creativity. His passion for metalworking and design has made him a trusted resource in the industry.
Professional Focus:
- Expert in Metal Fixtures : Edmund aesthetic specializes in creating durable and innovative metal fixtures, offering both appeal and functionality. His work reflects a deep understanding of metalworking techniques and materials.
- Sustainability Advocate : He is dedicated to using sustainable practices, ensuring that every fixture is crafted with eco-friendly methods while maintaining high-quality standards.
In his writing for Metal Fixes, Edmund provides valuable insights into the latest trends, techniques, and practical advice for those passionate about metal fixtures, whether they are professionals or DIY enthusiasts. His focus on combining artistry with engineering helps others discover the true potential of metal in design.