

Repairing metal pool pipes is a crucial maintenance task that can prevent costly water damage and ensure your pool functions efficiently. Whether you’re dealing with a minor leak or a significant break, addressing pipe issues promptly and effectively is essential for the longevity of your pool system. In this guide, we will walk you through the step-by-step process of how to repair metal pool pipe, gathering the necessary tools, and performing repairs to restore your pool’s plumbing to optimal condition. With the right approach, you can handle these repairs like a pro and maintain your pool for many seasons to come.

Importance of Metal Pool Pipes in Pool Systems
Metal pool pipes play a vital role in the overall functionality and efficiency of pool systems. Their primary purpose is to facilitate the smooth circulation of water, ensuring that it is filtered and treated effectively before re-entering the pool. Unlike other materials, metal pipes are known for their durability and strength, which help them withstand high pressure and resist potential damage over time.
These properties are particularly important in preventing water leaks that can lead to significant water loss and elevated maintenance costs. Additionally, metal pipes are capable of enduring harsh environmental conditions without corroding quickly, thus contributing to the longevity of the pool infrastructure. Ensuring that these pipes are in good condition is paramount to maintaining both the quality and enjoyment of your pool.
Tools and Materials Needed
Before beginning the repair process, it’s important to gather all the necessary tools and materials to ensure the job is done efficiently and effectively. Here is a list of essential items you will need:
- Pipe Cutter or Hacksaw: For cutting away the damaged section of the pipe.
- Pipe Wrench: To loosen or tighten pipe fittings.
- Adjustable Wrench: Useful for handling various sizes of nuts and bolts.
- Replacement Pipe Segment: Ensure it matches the diameter and type of existing metal pipe.
- Pipe Fittings: Connectors necessary to join the new pipe segment with the existing plumbing.
- Thread Sealing Tape (Teflon Tape): To ensure watertight fittings and prevent leaks.
- Pipe Sealant or Joint Compound: Provides additional sealing strength.
- Soldering Kit: If working with certain types of metal pipes, soldering may be required to secure joints.
- Safety Gear: Gloves and protective eyewear to protect against metal shavings and other hazards.
- Measuring Tape: To measure the length of pipe required accurately.
- Marker or Chalk: For marking the pipe where cuts need to be made.
10 Methods How to Repair Metal Pool Pipe
1. Identify the Problem Area
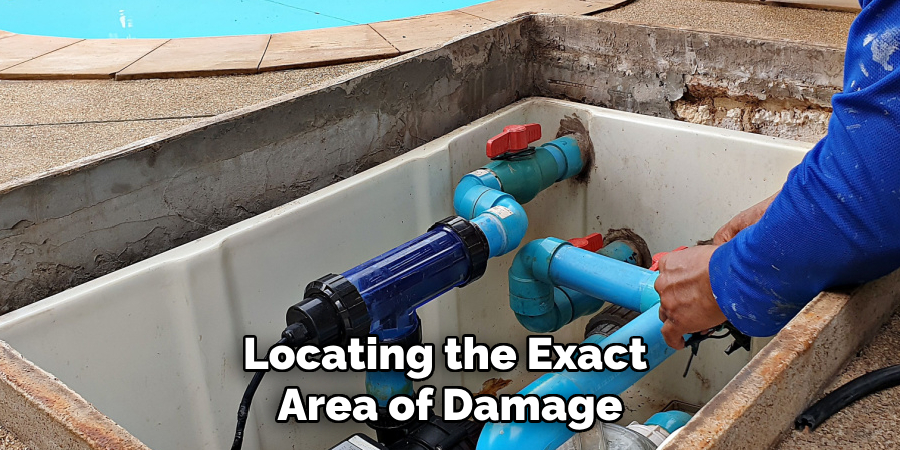
The first step in repairing a metal pool pipe is locating the exact area of damage. This might include leaks, rust, or dents that could disrupt water flow. Start by draining the pool system to reduce water pressure in the pipes, which will make inspection easier. Use a flashlight and inspect for visible cracks or rust spots. For hidden leaks, a dye test can help: inject a small amount of pool dye into the water near the suspected area and observe if it gets pulled into the pipe. Accurate identification ensures that you address the real issue without unnecessary dismantling.
2. Turn Off the Pool’s Water System
Before beginning any repair work, it is essential to shut off the water supply to the pool. Operating on a live system can lead to further complications or accidents. If your pool is equipped with a pump, switch it off as well. This prevents water pressure from causing additional leakage and makes the damaged area safer and more accessible for repairs. After shutting off the system, drain the affected pipe completely to ensure a dry working environment, which is crucial for most repair techniques.
3. Clean the Damaged Pipe
Once the area of damage is identified, clean the pipe thoroughly. Use a wire brush to scrub off dirt, debris, and rust from the surface. A clean pipe is necessary for repairs to adhere properly. For stubborn rust, apply a rust remover and follow the manufacturer’s instructions to ensure the pipe’s surface is smooth and free of contaminants. A clean surface also makes it easier to detect hairline cracks or pinhole leaks that may have been hidden beneath debris.
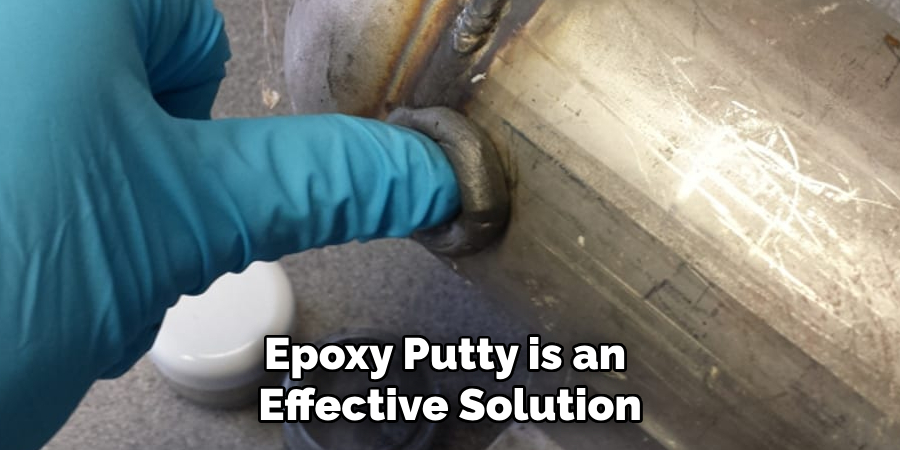
4. Apply Epoxy Putty for Minor Leaks
Epoxy putty is an effective solution for sealing minor cracks or pinhole leaks in metal pipes. This material hardens when exposed to air, forming a durable bond. To use epoxy putty, knead the two components together until they form a uniform color. Press the putty over the damaged area and smooth it out with your fingers. Allow the putty to cure according to the product instructions before testing the repair. Epoxy putty is a quick and budget-friendly solution, though it might not be sufficient for more significant damage.
5. Replace the Damaged Section
For extensive damage, replacing the affected section of the metal pipe may be the only viable solution. Use a pipe cutter or hacksaw to remove the damaged portion, ensuring the cut is clean and even. Measure the gap carefully and obtain a replacement piece of the same material and diameter. Use pipe connectors or couplings to attach the new section, securing it with pipe clamps or adhesive, depending on the system’s requirements. This method provides a permanent fix for severe cracks or rust.
6. Use Pipe Clamps for Emergency Repairs
Pipe clamps are a temporary but reliable solution for leaks. These devices consist of a metal band and a rubber gasket that wraps around the damaged pipe. Place the rubber gasket over the leak and secure it with the metal band using screws or a tightening mechanism. While this method stops leaks quickly, it’s not a permanent solution and should be replaced with a more durable repair when possible. Pipe clamps are especially useful in emergencies when immediate action is required to prevent water loss.
7. Soldering for Permanent Fixes
If the damaged pipe is made of copper or another solderable metal, soldering can provide a long-lasting repair. Start by cleaning the damaged area with sandpaper or a wire brush to remove oxidation and ensure a strong bond. Apply flux to the cleaned area to facilitate solder flow. Heat the pipe with a propane torch until the metal is hot enough to melt solder. Apply solder to the joint, allowing it to flow into the cracks. Let it cool and test the repair. Soldering requires some skill but offers a durable solution.
8. Install a Repair Coupling
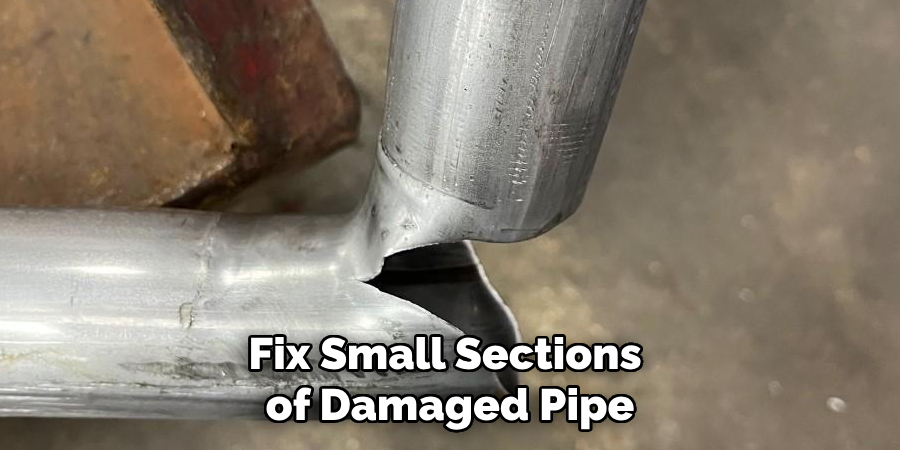
Repair couplings are designed to fix small sections of damaged pipe without replacing the entire length. These fittings consist of a sleeve that slides over the damaged area, providing a tight seal. To install a repair coupling, cut out the damaged section of the pipe and smooth the edges. Slide the coupling over the pipe ends and tighten it according to the manufacturer’s instructions. This method is straightforward and effective for localized damage, offering a semi-permanent repair option.
9. Weld the Damaged Area
For pipes made of steel or other weldable metals, welding is a robust repair method. This process involves using a welding torch to fuse the metal around the damaged area. Before welding, clean the surface thoroughly and remove any paint, rust, or debris. Position the pipe securely and weld the edges of the crack or hole. After welding, sand the area to smooth it out and apply a protective coating to prevent rust. Welding requires specialized equipment and expertise but provides a durable and permanent solution.
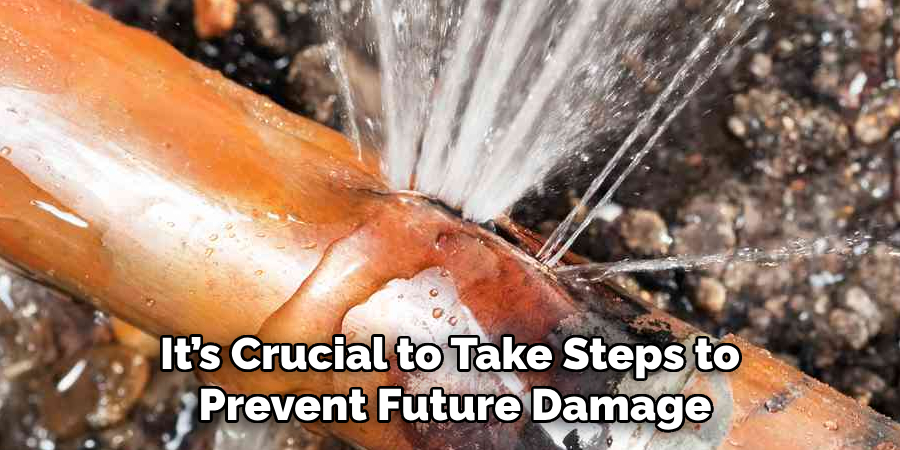
10. Preventative Maintenance Post-Repair
After completing the repair, it’s crucial to take steps to prevent future damage. Apply a rust inhibitor or metal sealant to the repaired pipe to protect it from corrosion. Regularly inspect the entire pool system for signs of wear and tear, addressing issues before they escalate. Maintaining a balanced pool water chemistry also helps reduce the risk of corrosion in metal pipes. Consider investing in high-quality pipe materials and fittings to minimize the likelihood of future repairs.
Common Mistakes to Avoid
- Neglecting Safety Precautions: Always prioritize safety by using protective gear, such as gloves and goggles, and ensuring the area is well-ventilated when working with chemicals or tools.
- Rushing the Repair Process: Take time to properly diagnose and repair the issue. Skipping steps like thorough cleaning or allowing materials to cure can lead to ineffective repairs and further damage.
- Using Incompatible Materials: Ensure all repair materials are compatible with the pool’s piping system. Using the wrong type of epoxy, solder, or coupling can result in poor adhesion or additional leaks.
- Ignoring Instructions: Always follow the manufacturer’s instructions for any repair product or equipment. Misuse of materials can hinder the repair process and void warranties.
- Over-Tightening Clamps and Fittings: Excessive force can damage the pipe or fittings, making leaks worse. Tighten only as much as recommended in the instructions.
Conclusion
Repairing metal pool pipes may seem daunting at first, but with the right tools, materials, and techniques, it becomes a manageable task that can be tackled by any pool owner. By understanding the importance of maintaining your pool’s plumbing system and following a systematic approach to identify and address pipe issues, you can prevent costly repairs and prolong the life of your pool. So, there you have it – a quick and easy guide on how to repair metal pool pipe.
Edmund Sumlin is a skilled author for Metal Fixes, bringing 6 years of expertise in crafting a wide range of metal fixtures. With a strong background in metalwork, Edmund’s knowledge spans various types of fixtures, from decorative pieces to functional hardware, blending precision with creativity. His passion for metalworking and design has made him a trusted resource in the industry.
Professional Focus:
- Expert in Metal Fixtures : Edmund aesthetic specializes in creating durable and innovative metal fixtures, offering both appeal and functionality. His work reflects a deep understanding of metalworking techniques and materials.
- Sustainability Advocate : He is dedicated to using sustainable practices, ensuring that every fixture is crafted with eco-friendly methods while maintaining high-quality standards.
In his writing for Metal Fixes, Edmund provides valuable insights into the latest trends, techniques, and practical advice for those passionate about metal fixtures, whether they are professionals or DIY enthusiasts. His focus on combining artistry with engineering helps others discover the true potential of metal in design.